The Front Page section is divided into multiple sections as shown in the screenshot below and explained below:

Banner Slider #
1. From the Customize section, go to Travelstore Settings.
2. From Travelstore Settings, you will see Banner Slider Option.
3. In the Banner Slider Option you will see:

- Enable Section?: This option allows you to enable/disables the banner slider section.
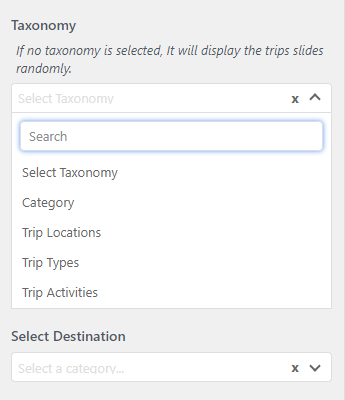
- Taxonomy: There are Three available options which you can choose according to your requirement.
- Category
- Trip Locations
- Trip Types
- Trip Activities

Note: Option 2, 3 and 4 i.e. Trip Locations, Trip Types and Trip Activities will appear in the dropdown option only after activation of WP Travel Plugin which is recommended by the theme.
Options 1: When “Category” is selected you will find the following option:
- You have to select a category.
- Click the “Save & Publish” button to save changes.
Options 2: When ”Trip Locations” is selected you will find following option:
- Select Destination: Select the desired location for the Slider section. The location that you have entered using the plugin will appear here.
- Click the“Save & Publish” button to save changes.
Options 3 : When ”Trip Types” is selected you will find following option:
- Select Trip Types: Select the desired Trip types for the Slider section. The trip type that you have entered using the plugin will appear here.
- Click the “Save & Publish” button to save changes.
Options 4 : When ”Trip Activities” is selected you will find following option:
- Select Trip Activity: Select the desired Trip activity for the Slider section. The trip activity that you have entered using the plugin will appear here.
- Click the “Save & Publish” button to save changes.
Front End:

Trip Search #
Note: This section will only appear after activating the WP Travel Plugin. When WP Travel Plugin is activated, recommended by the theme itself, a new section will appear in the Home Page section, i.e. Trip Search.
1. From the Customize section, go to Travelstore Settings.
2. From Travelstore Settings, you will see Trip Search Option.
3. In the Trip Search Option you will see:

Front End:

Category Slider #
1. From the Customize section, go to Travelstore Settings.
2. From Travelstore Settings, you will see Category Slider Option.
3. In Category Slider Option you will see:

- Enable Section?: This option allows you to enable/disables the category slider section.
- Title: This option allows you to add a title or edit the title.
- Number of Items: This option allows you to add a number for showing how many posts or trips to show.
- Taxonomy: There are Three available options which you can choose according to your requirement.
- Category
- Trip Locations
- Trip Types
- Trip Activities

Note: Option 2, 3 and 4 i.e. Trip Locations, Trip Types and Trip Activities will appear in the dropdown option only after activation of WP Travel Plugin which is recommended by the theme.
Front End:
Latest Posts #
1. From the Customize section, go to Travelstore Settings.
2. From Travelstore Settings, you will see Latest Posts Option.
3. In the Latest Posts Option you will see:

- Enable Section?: This option allows you to enable/disables the latest Posts section.
- Title: This option allows you to add a title or edit the title.
- Taxonomy: There are Three available options which you can choose according to your requirement.
- Category
- Trip Locations
- Trip Types
- Trip Activities

Note: Option 1, 2 and 3 i.e. Trip Locations, Trip Types and Trip Activities will appear in the dropdown option only after activation of WP Travel Plugin which is recommended by the theme.
Options 1: When Trip Locations is selected you will find following option:
- Select Destination: Select the desired location for the Slider section. The location that you have entered using the plugin will appear here.
- Click the“Save & Publish” button to save changes.
Options 2 : When Trip Types is selected you will find following option:
- Select Trip Types: Select the desired Trip types for the Slider section. The trip type that you have entered using the plugin will appear here.
- Click the “Save & Publish” button to save changes.
Options 3 : When Trip Activities is selected you will find following option:
- Select Trip Activity: Select the desired Trip activity for the Slider section. The trip activity that you have entered using the plugin will appear here.
- Click the “Save & Publish” button to save changes.
- Call To Action: This option allows you to show the trips

Front End:
Featured Trips #
Note: This section will only appear after activating the WP Travel Plugin. When WP Travel Plugin is activated which is recommended by the theme itself, a new section will appear in the Home Page section i.e. Featured Trips Section.
1. From the Customize section, go to Travelstore Settings.
2. From Travelstore Settings, you will see Featured Trips Option.
3. In the Featured Trips Option you will see:
- Enable Section?: This option allows you to enable/disables the featured trips section which we can show the most featured trips in this section.
When we enable featured trips slider sections, there are options. They are: - Title: After enable button, this option appeared and allows you to add a title according to your requirement.
Trips Offers #
Note: This section will only appear after activating the WP Travel Plugin. When WP Travel Plugin is activated which is recommended by the theme itself, a new section will appear in the Home Page section i.e. Trips Offer Section.
1. From the Customize section, go to Travelstore Settings.
2. FromTravelstore Settings, you will see the Trips Offers Option.
3. In the Trips Offers Option you will see:

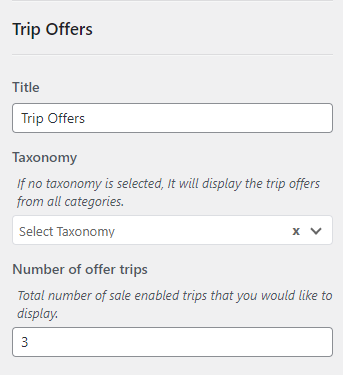
- Enable Section?: This option allows you to enable/disable the trip offers section as shown in the screenshot above.
When we enable Trip Offers section, there are options. They are
- Title: This option allows you to add a title.
- Taxonomy: There are Three available options which you can choose according to your requirement.
- Category
- Trip Locations
- Trip Types
- Trip Activities

Note: Option 2, 3 and 4 i.e. Trip Locations, Trip Types and Trip Activities will appear in the dropdown option only after activation of WP Travel Plugin which is recommended by the theme.
Options 1: When “Category” is selected you will find the following option:
- Number of offer trips: This option allows you to add a number for showing how many posts category to show.
- Click the “Save & Publish” button to save changes.
Options 2: When ”Trip Locations” is selected you will find following option:
- Select Destination: Select the desired location for the Slider section. The location that you have entered using the plugin will appear here.
- Click the“Save & Publish” button to save changes.
Options 3 : When ”Trip Types” is selected you will find following option:
- Select Trip Types: Select the desired Trip types for the Slider section. The trip type that you have entered using the plugin will appear here.
- Click the “Save & Publish” button to save changes.
Options 4 : When ”Trip Activities” is selected you will find following option:
- Select Trip Activity: Select the desired Trip activity for the Slider section. The trip activity that you have entered using the plugin will appear here.
- Click the “Save & Publish” button to save changes.
3. Number of Offer Trip: This option allows you to add a number for showing how many offers trips to show.
4. Call To Action: This option allows you to show the trips.

Customer Reviews #
Note: This section will only appear after activating the WP Travel Plugin. When WP Travel Plugin is activated which is recommended by the theme itself, a new section will appear in the Home Page section i.e. Customer Reviews Section.
1. From the Customize section, go to Travelstore Settings.
2. From Travelstore Settings, you will see Customer Review Option.
3. In the Customer Review Option you will see:

- Enable Section?: This option allows you to enable/disables the customer review section which will show after customers add a review in the individual trips .
- Title: This option allows you to add a title in this section.
- Filter Reviews: This option allows you to show the reviews of the customers.


