After activation by default, you will see the list of posts on the home page. You can change the home page into the structure as shown in Travel Log Pro Demo Page. For that, you need to set up a static front page.
How to manage Static Front Page?
To set a static front page we need to have a page that can be set as a static front page. If you already have a page then that’s fine otherwise follow the steps:
- Hover over the “Pages” menu
- You will see “Add New” under “All Pages”
- Click “Add New“
- You will be redirected to new page from.
- Add title “Home” or any title you want.
- Leave editor blank
- Click publish
Now you can set page “Home” (or any page you created) as static front page. When you set static front page, your blog posts will be removed from homepage. So if you want to show blogs posts then you need to create blog page too. Follow above steps and create “Blog” page or any title you want to give for blog page. Now that we have both “Home” and “Blog” page, we are ready to set static front page. Follow the steps to set static front page:
- Hover over “Appearance”
- Click “Customize”
- Go to Static FrontPage.
- From Static Front Page section
- Choose the “A static page” option under the “Front page displays” title.
- You will be able to set any page as a static front page and blog page as shown in the image below.
- Click the “Save & Publish” button to save changes.
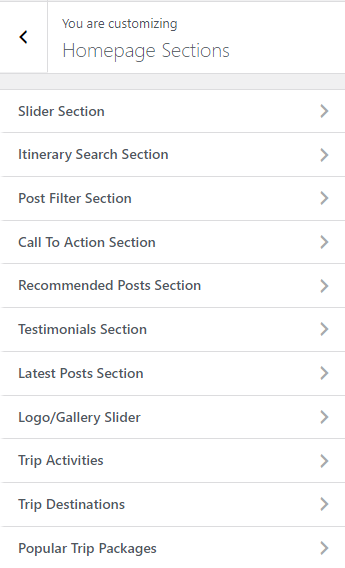
Home Page Sections #
The Home Page is divided into different section as shown in the given demo image below:
The different sections are described below:
- Top Header Section: This section is setup from Admin Panel / Appearance / Customize / Theme Options / Header Options. Refer below How to manage Header Options? for more details. Site Identity Section: The Site Identity section is set up from Admin Panel / Appearance / Customize / Site Identity Refer below How to manage Site Title, Logo, Tagline, and Site Icon? Primary Menu: For the primary menu section you need to create a menu and assign its location to Primary Menu going to Admin Panel / Appearance / Customize / Menus / Menu Location. Refer below How to manage Menus? for more detail. Top Header Section: To display the menu in the top right and display phone no. and email at the top left in the Top Header section you need to create two different menus and assign its location to Top Left Links and Social Links by going to Admin Panel / Appearance / Customize / Menus / Menu Location. Refer below How to manage Menus? for more detail.
- Slider Section: To set up this section you need to go to Admin Panel / Appearance / Customize / Homepage Sections Options / Slider Sections . Refer below How to manage Slider Sections? for more detail.
- Find Your Perfect Tour Section: To set up this section you need to go to Admin Panel / Appearance / Customize / Homepage Sections Options / Post filter Sections. Refer below How to manage Post filter Sections? for more detail.
- The Vacation Belongs To You Section: To set up this section you need to go to Admin Panel / Appearance / Customize / Homepage Sections Options / Call To Action Sections. Refer below How to manage Call To Action Sections? for more detail.
- Recommended Trips Section: To set up this section you need to go to Admin Panel / Appearance / Customize / Homepage Sections Options / Recommended Posts Sections. Refer below How to manage Recommended Posts Sections? for more detail.
- What our customers are saying about us Section: To set up this section you need to go to Admin Panel / Appearance / Customize / Homepage Sections Options / Testimonials Sections. Refer below How to manage Testimonials Sections? for more detail.
- Latest Blog Posts Section: To set up this section you need to go to Admin Panel / Appearance / Customize / Homepage Sections Options / Latest Post Sections. Refer below How to manage the Latest Post Sections? for more detail.
- Gallery Section: This section set up using the widget. To set up the gallery section as in the demo you need to go to Admin Panel / Appearance / Customize / Widget / Front Page Widget Area and place the widget ” Gallery” (WordPress default widget). Refer below How to add gallery images on the front page? for more detail.
- Footer Widget Section: This section is set up from the widget. Widgets will be available in the widget sections. So you need to go to Admin Panel / Appearance / Customize / Widgets / Footer Widget 1, Footer Widget 2, and Footer Widget 3 and add your desired widget. Currently, the active widget is Text, Recent Post and Custom Menu. Refer below How to manage theme available widgets? for more detail.
- Footer Copyright Section: To set up this section you need to go to Admin Panel / Appearance / Customize / Footer Options / Footer Copyright. For the Menu, you need to assign the social menu to the Footer menu location by going to Admin Panel / Appearance / Customize / Menus / Menu Locations.


